The finishing touches
As published recently in CompassSport magazine.
There are things you may not immediately notice on an orienteering map, but upon closer inspection, you think look really good. You’ll probably find they do most of the things we’re about to talk about. Perhaps it’s subconscious, but they all help make the map easier on the eye. Most are mentioned somewhere in ISOM but it’s useful to see them in practice.
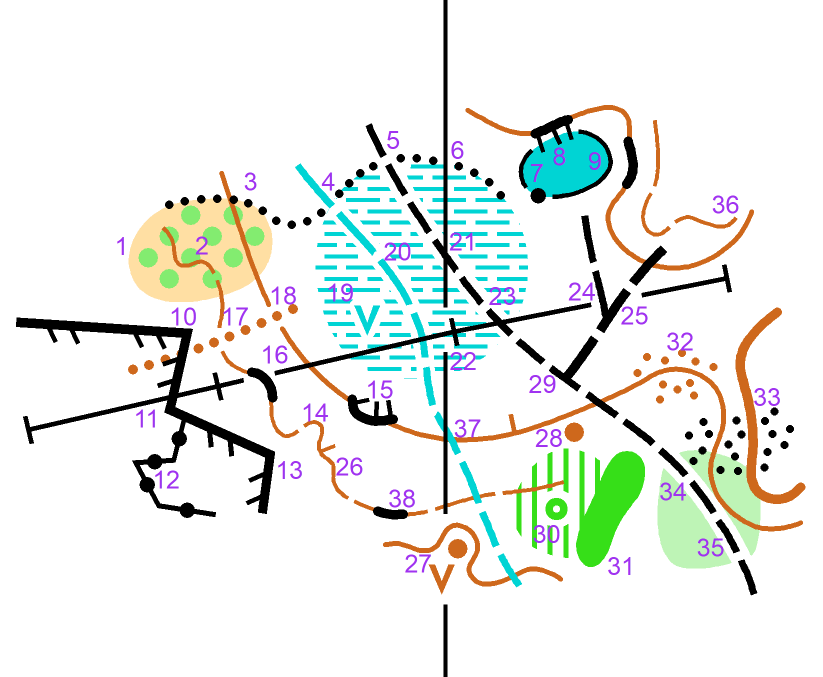
Above is an untidy extract of map (it is not anywhere in reality, just an example). How many things can you spot that look untidy?
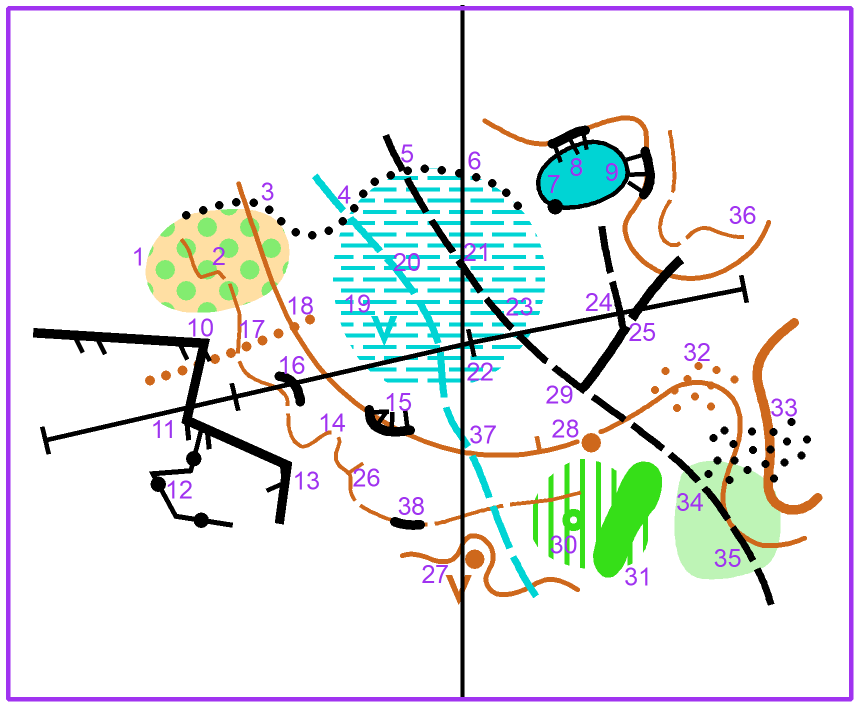
(Note: In CompassSport magazine, two of these map extracts were erroneously switched, which made things rather confusing. The Editor apologises.)
Of course, fixing all of these things takes time, and the benefits are small compared to other decisions the mapper makes, such as whether or not to map a certain feature. For a map that will only ever be used for local events, perhaps it’s not worth it. However, fixing/improving them has no downsides so it’s good to do if you can.
1. Try to only show whole circles in areas of scattered trees and bushes, sandy ground and cultivated land. It makes the edge more defined, especially if the surroundings are one of the two colours. In Symbol -> Edit -> Structure tick ‘Do not cut structure element at border’ or duplicate the object and turn one to the background colour and adjust the other.
2. No sharp corners in contours and form lines except in very rare circumstances. For other line features, think about whether it is a curve or a sharp corner in reality and match it.
3. A veg boundary should follow the boundary exactly. The same goes for boundaries of lakes and paved areas. Use the ‘snapping’ tool (quick and easy with keyboard shortcuts).
4. 5 and 6. Cut the veg boundary for the other line features crossing it.
7. Cut the boundary for a point object of the same colour. Another common example would be cutting the edge of a paved area for a statue, boulder, man-made object or even a fence tag.
8. If you can’t pass between crag and lake, cut the lake boundary and overhang the tags.
9. If you can pass between crag and lake, make that gap visible.
10. - 14. Fence tags on straight lines, not at corners. The same goes for all other tagged or dotted line features. This is done by using ‘dash’ and ‘corner’ vertices in OCAD. OOM deals with these slightly differently.
15. Crags should ‘interplay’ with the contours and also try not to have the tags touching each other, which may mean redrawing the tags manually.
16. Crags ‘interplaying’ with contours means touching for probably at least half of the length!
17. And 18. Cut contours and form lines for erosion gullies.
19. And 30. Cut an area for a point object of the same colour, using the ‘Cut Hole’ tool. Ideally leave a 0.15mm gap. Depending on the combination of colours, this should be done in other cases too: cut a marsh for a knoll (naturally should happen anyway) or distinctive tree, but probably not for a boulder.
20. Cut marshes for streams and ditches.
21. and 23. Here we needn’t cut the north line or power line, as we can make it look neat and tidy by using a dash vertex on the path.
22. Here we could move the pylon slightly to give 0.15mm, but I’d say the position of the pylon takes priority over a north line so let’s cut the north line.
24. and 29. Avoid path junctions on the gaps in the paths - fixed using a dash vertex again.
25. Here cutting the power line makes sense so the path junction is clearer.
26. Tags on contours or form lines should be in re-entrants or long straight sections, not on spurs.
27. Sometimes it’s wise to cut north lines for areas of detail, even if they are different colours.
28. Don’t cut contours for knolls. The same goes for small depressions, pits and brown triangle ‘platforms’. We have a few options here: A) move the knoll south and connect the contour, B) draw a spur in the contour, C) move the whole section of contour north. For ‘natural’ knolls like at 28 we should never really have this problem, but occasionally we get a man-made knoll, and the spur (B) may not exist. Prioritising the correct position of the knoll (relative to e.g. nearby path junction) we’ll go for C in this case.
31. Here the two short undergrowth stripes are below the minimum size, despite being drawn as part of the same object as the larger area to the NW. They disturb the boundary of the thicket so probably delete them (but they could also be enlarged instead depending on how it looks in reality).
32. Move broken ground dots away from contours. Obviously, the position of the contour is prioritised over the positions of the dots.
33. Contour shapes can also become harder to see when underneath stony ground. Moving the stony ground dots off the contours can help with this. No-one will read this as three separate stony ground patches.
34. In most cases I’d suggest cutting green areas (and marshes) for paths, assuming the usual fast runnability on the path is unaffected. ISOM doesn’t tell us explicitly whether to do this or not for paths, but it does tell us for rides - white or yellow open for a fast ride, green surroundings of different shades mean reduced runnability. Someone could easily extrapolate this rule to paths too, so cutting removes any ambiguity.
35. Try not to overlap line features where it doesn’t make sense, especially contours hiding underneath paths. Naturally, a path or road will usually be flatter than the slope around it, perhaps with a steeper bank above or below, so put the contour there.
36. End form lines parallel to contours.
37. Even for line features of different colours, it looks neater to avoid crossings on the gaps.
38. Try not to have a form line gap right next to the end of a crag, just as you wouldn’t have one right at the end of a form line.
How much of this you do whilst out doing fieldwork vs sitting at your desk is entirely up to you. Traditionally these would probably all be things done at the desk, and for many that may still be the preferred option. It is probably quicker overall, and in particular, minimises the time spent doing fieldwork, which is attractive if you have to travel to the area and are not guaranteed good weather. However, there are some advantages to doing some of these things in the field: to minimise the risk of anything untidy ending up on the final map, you’d never draw anything untidy in the first place! Also, if there are decisions to be made about prioritising one feature over another, or nudging symbols around for space, you can be more confident the map still matches the ground if you do this in the field.
Lastly, I encourage you to get out the map of the most recent event you ran, or flick to another map in this magazine. How many of these things can you spot? What has the mapper done well? What could be improved? Hopefully this helps you with any maps you might make in the future!